In this post I’m going to show how I created an Amazon Machine Instance with GROMACS 5.0.7 installed for use in the Amazon Web Services cloud.
I’m going to assume that you have signed up for Amazon Web Services (AWS), created an Identity and Access Management (IAM) user (each AWS account can have multiple IAM users), created an SSH key pair for that user, downloaded it, given it an appropriate name with the correct permissions and placed it in. ~/.ssh. Amazon have a that cover the above actions. One thing that confused me is if you already have an or account then you can use this to signup to AWS. In other words, depending on your mood, you can order a book or 10,000 CPU hours of compute. I felt a bit nervous about setting up an account backed by my credit card – if you also feel nervous, then Amazon offer a which permits you at present to use up to 750 hours a month, as long as you only use the smallest virtual machine instance (t2.micro). If you use more than this, or use a more powerful instance then you will be billed.
First, log in to your AWS console. This will have a strange URL like
https://123456789012.signin.aws.amazon.com/console
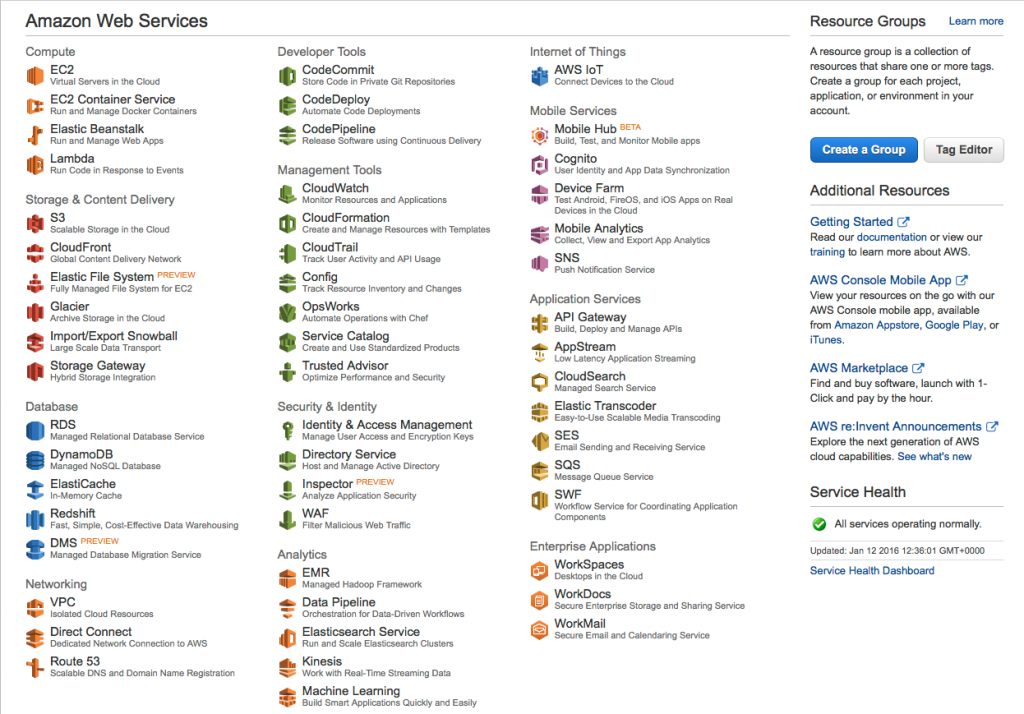
where 123456789012 is your AWS account number. You should get something that looks like this.
Next we need to create an EC2 (ElastiCloud) instance based on one of the standard virtual machine images and download and compile GROMACS on it. In the AWS Management Console, choosing “EC2�? in the top left should bring you here
Now click the Blue “Launch Instance�? button.
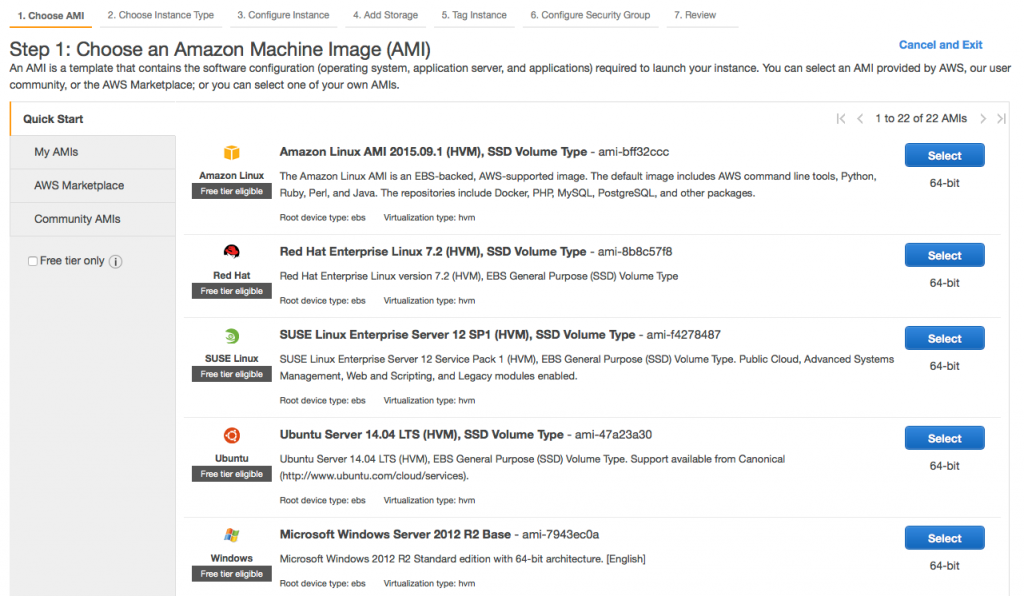
Step 1. Choose an Amazon Machine Instance (AMI).
Here we can choose one of the standard virtual machine images to compile GROMACS on. Let’s keep it simple and use the standard Amazon Linux AMI.
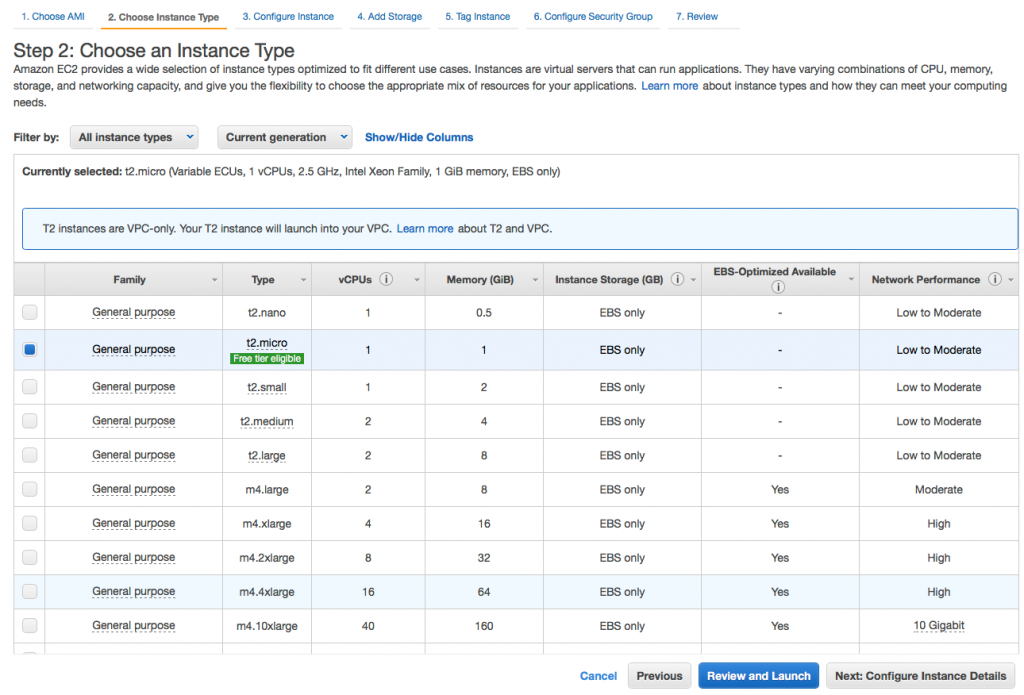
Step 2. Choose an Instance Type.
The important thing to remember here is that the image we create can be run on any instance type. So if we want to compile on multiple cores to speed things up we can choose an instance with say 8 vCPUs, or if we don’t want to be billed and are willing to wait that we can choose the t2.micro instance. Let’s choose an c4.2xlarge instance which has 8 vCPUs. You can at this stage hit “Review and Launch�? but it is worth checking the amount of storage allocated to the instance. So hit Next:Configure Instance Details. I’m not going to fiddle with these options. Hit Next:Add Storage.
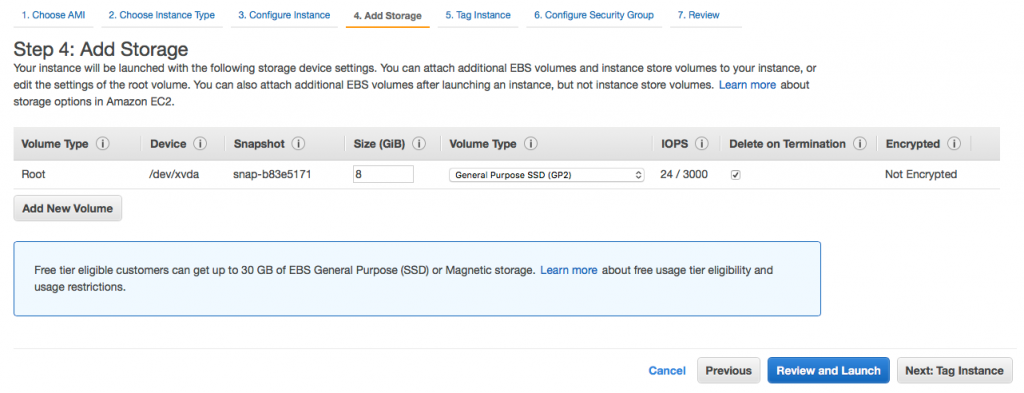
Step 4. Add storage.
What I have found here is if you use the version of gcc installed via yum (4.8.3) then 8 GB is fine, but if you want to compile a more recent version you will need at least 12 GB.
I’m going to accept the rest of the defaults for the rest of the steps so will click “Review and Launch�? now.
Step 7. Review instance Launch.
Check it all looks ok and hit “Launch�?. This will bring up a window. Here it is crucial that you choose the name of the keypair you created and downloaded. As you need a different key pair for each IAM user for each Amazon Region, it is worth naming them carefully as you will otherwise rapidly get very confused. Also Amazon don’t let you download a key pair again so you have to be careful with them. You can see mine is called
PhilFowler-key-pair-euwest.pem
Which contains the name of my IAM user and the name of the AWS region it will work for, here EU West, which is Ireland. Hit Launch.
Launch Status
This window gives you some links on how to connect to the AWS instance. Hit View Instances�?�?. It may take a minute or two for your instance to be created. During this time the status is given as “Initializing�?. When it is finished, you can click on your new instance (you should have only one) and it will give you a whole host of information. We need the public IP address and the name of our SSH key pair so we can ssh to the instance (Note that the user by default is called ec2-user).
lambda 508 $ ssh -i "PhilFowler-key-pair-euwest.pem" [email protected]
The authenticity of host '54.229.73.128 (54.229.73.128)' can't be established.
ECDSA key fingerprint is SHA256:N+B3toLxLE3vRuuzLZWF44N9qb3ucUVVU/RD00W3iNo.
Are you sure you want to continue connecting (yes/no)? yes
Warning: Permanently added '54.229.73.128' (ECDSA) to the list of known hosts.

__| __|_ )
_| ( / Amazon Linux AMI
___|\___|___|

https://aws.amazon.com/amazon-linux-ami/2023.09-release-notes/
11 package(s) needed for security, out of 27 available
Run "sudo yum update" to apply all updates.
[ec2-user@ip-172-30-0-42 ~]$
Installing pre-requisites
Amazon Linux is based on CentOS so uses the yum package manager. You might be more familiar with apt-get if you use Ubuntu but the principles are similar. Worth following their recommendation and applying all the updates – this will spew out a lot of information to the terminal and asks you to confirm.
[ec2-user@ip-172-30-0-42 ~]$ sudo yum update
Loaded plugins: priorities, update-motd, upgrade-helper
Resolving Dependencies
--> Running transaction check
---> Package aws-cli.noarch 0:1.9.1-1.29.amzn1 will be updated
---> Package aws-cli.noarch 0:1.9.11-1.30.amzn1 will be an update
---> Package binutils.x86_64 0:2.23.52.0.1-30.64.amzn1 will be updated
---> Package binutils.x86_64 0:2.23.52.0.1-55.65.amzn1 will be an update
---> Package ec2-net-utils.noarch 0:0.4-1.23.amzn1 will be updated
...
sudo.x86_64 0:1.8.6p3-20.21.amzn1
vim-common.x86_64 2:7.4.944-1.35.amzn1
vim-enhanced.x86_64 2:7.4.944-1.35.amzn1
vim-filesystem.x86_64 2:7.4.944-1.35.amzn1
vim-minimal.x86_64 2:7.4.944-1.35.amzn1

Complete!
This instance is fairly basic and there is no version of gcc, cmake etc. But we can install them via yum
[ec2-user@ip-172-30-0-42 ~]$ sudo yum install gcc gcc-c++ openmpi-devel mpich-devel cmake svn texinfo-tex flex zip libgcc.i686 glibc-devel.i686
...
texlive-xdvi.noarch 2:svn26689.22.85-27.21.amzn1
texlive-xdvi-bin.x86_64 2:svn26509.0-27.20130427_r30134.21.amzn1
zziplib.x86_64 0:0.13.62-1.3.amzn1

Complete!
Next we need to add some the openmpi executables to the $PATH. These will only persist for this session; to make them permanent add them to the .bashrc.
export PATH=/usr/lib64/openmpi/bin:$PATH
export LD_LIBRARY_PATH=/usr/lib64/openmpi/lib
Now we hit a potential problem. The version of gcc installed by yum is fairly old
[ec2-user@ip-172-30-0-42 ~]$ gcc --version
gcc (GCC) 4.8.3 20140911 (Red Hat 4.8.3-9)
Copyright (C) 2013 Free Software Foundation, Inc.
This is free software; see the source for copying conditions. There is NO
warranty; not even for MERCHANTABILITY or FITNESS FOR A PARTICULAR PURPOSE.
Having said that 4.8.3 should be good enough for GROMACS. I’ll push ahead using this version, but in a subsequent post I also detail how to download and install gcc 5.3.0.
Compiling GROMACS
First, let’s get the GROMACS source code using wget. I’m going to compile version 5.0.7 since I’ve got benchmarks for this one, but you could equally install 5.1.X.
[ec2-user@ip-172-30-0-42 ~]$ mkdir ~/packages
[ec2-user@ip-172-30-0-42 ~]$ cd ~/packages
[ec2-user@ip-172-30-0-42 packages]$ wget ftp://ftp.gromacs.org/pub/gromacs/gromacs-5.0.7.tar.gz
[ec2-user@ip-172-30-0-42 packages]$ tar zxvf gromacs-5.0.7.tar.gz
[ec2-user@ip-172-30-0-42 packages]$ cd gromacs-5.0.7
Now let’s make a build directory, move there and then issue the cmake directive
[ec2-user@ip-172-30-0-42 gromacs-5.0.7]$ mkdir build-gcc48
[ec2-user@ip-172-30-0-42 gromacs-5.0.7]$ cd build-gcc48
[ec2-user@ip-172-30-0-42 build-gcc48]$ cmake .. -DGMX_BUILD_OWN_FFTW=ON -DCMAKE_INSTALL_PREFIX='/usr/local/gromacs/5.0.7/
The compilation step will take a good few minutes on a single core machine, but as I’ve got 8 virtual CPUs to play with I can give make the “-j 8�? flag which is going to speed things up.
[ec2-user@ip-172-30-0-42 build-gcc48]$ make -j 8
...
Building CXX object src/programs/CMakeFiles/gmx.dir/gmx.cpp.o
Building CXX object src/programs/CMakeFiles/gmx.dir/legacymodules.cpp.o
Linking CXX executable ../../bin/gmx
[100%] Built target gmx
Linking CXX executable ../../bin/template
[100%] Built target template
This took 90 seconds using all 8 cores. Now we can install the binary. Note that because I told cmake to install it in /usr/local/gromacs/5.0.7 so I can keep track of different versions, rather than just having /usr/local/gromacs
[ec2-user@ip-172-30-0-51 build-gcc48]$ sudo make install
...
-- Installing: Creating symbolic link /usr/local/gromacs/5.0.7/bin/g_velacc
-- Installing: Creating symbolic link /usr/local/gromacs/5.0.7/bin/g_wham
-- Installing: Creating symbolic link /usr/local/gromacs/5.0.7/bin/g_wheel
To add this version of GROMACS to your $PATH (add this to .bashrc to avoid doing this each time)
[ec2-user@ip-172-30-0-51 build-gcc48]$ source /usr/local/gromacs/5.0.7/bin/GMXRC
Now you have all the GROMACS tools available!




One thought on “GROMACS on AWS�?